How to Save a Dying Norfolk Island Pine
Norfolk Island Pines (Araucaria heterophylla) are captivating evergreen trees known for their graceful, feathery foliage. These botanical wonders, native to Norfolk Island in the South Pacific, have become popular indoor and outdoor ornamental plants.
However, even the most robust Norfolk Island Pine can face health challenges, which is why understanding how to revive a struggling one is crucial.
In this comprehensive guide, we’ll delve into the intricacies of rescuing a dying Norfolk Island Pine. We’ll explore various aspects, from assessing its health to addressing environmental factors and providing you with expert tips to ensure your beloved tree thrives once more.

Assessing the Health of Your Norfolk Island Pine
In this section, we’ll guide you through a comprehensive assessment of your Norfolk Island Pine’s health, helping you decipher the subtle indicators that can reveal the underlying issues affecting your beloved tree.
Explore the following subheadings for a detailed examination:
Visual Inspection: Deciphering Nature’s Clues
Discover how to interpret your Norfolk Island Pine’s visual cues, such as the condition of its leaves, trunk, and overall appearance. Learn to identify signs of distress, which may range from yellowing needles to structural damage.
Soil and Pot Examination: The Foundation of Recovery
Explore the critical role of soil and pot quality in your pine’s health. Understand how the soil’s texture, drainage, and the pot’s size can impact your tree’s growth and vitality. Additionally, delve into recognizing and addressing nutrient deficiencies.
Watering and Moisture Levels: The Art of Hydration
Master the art of proper watering techniques for your Norfolk Island Pine. Learn to discern signs of overwatering and underwatering, ensuring your tree receives the right amount of moisture for optimal health.
Reviving a Dying Norfolk Island Pine
Is your Norfolk Island Pine showing signs of distress? Discover the essential steps to breathe new life into your struggling evergreen. From repotting strategies to pruning techniques and soil reinvigoration, this comprehensive guide will equip you with the knowledge and skills needed to revitalize your precious Norfolk Island Pine.
Learn the art of rescuing your tree and watch it thrive once more with these expert tips and tricks.
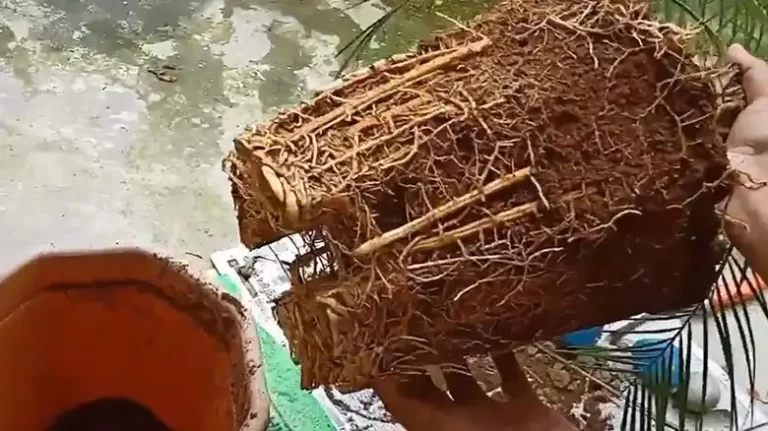
Repotting: Providing a Fresh Start
Repotting is often the first step in saving a fading Norfolk Island Pine. This vital procedure offers your tree a chance to escape the confines of its current pot, allowing the roots to spread and flourish. By selecting the right time, pot, and approach, you can set the stage for a remarkable recovery.
Timing is Crucial
When determining the right moment to repot your Norfolk Island Pine, consider its current state and growth patterns. Aim for the spring or early summer months when the tree is actively growing. This period grants your pine the best chance to adapt to its new environment.
The Perfect Pot
Selecting an appropriate pot is more than just aesthetics—it directly impacts your pine’s well-being. Opt for a pot that provides ample room for root expansion, with drainage holes to prevent waterlogged soil. A larger pot with fresh, well-draining soil allows the roots to breathe and absorb nutrients efficiently.
The Repotting Process
Repotting your Norfolk Island Pine requires care and precision. Gently remove the tree from its current container, untangle any bound roots, and place it in the new pot, ensuring the root ball sits comfortably. Fill the remaining space with fresh potting mix, creating a conducive environment for growth.
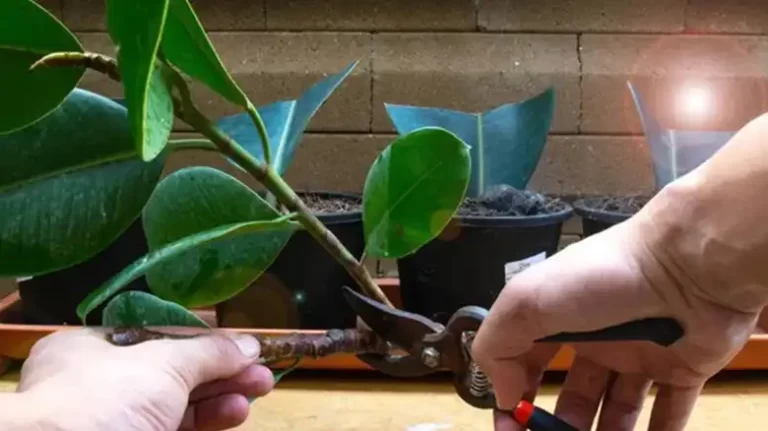
Pruning and Trimming: Shaping a Comeback
Pruning and trimming are akin to an artistic intervention for your Norfolk Island Pine. By carefully assessing and sculpting your tree, you can not only restore its aesthetic appeal but also stimulate new, healthy growth.
Removing the Old and Unhealthy
Start by identifying and removing any dead, diseased, or yellowing branches. This step not only enhances the tree’s appearance but also redirects vital resources towards new growth. Use sharp, clean pruning shears for precise cuts, ensuring the overall health of the tree.
Trimming for Balance
Norfolk Island Pines can sometimes become lopsided or leggy, which can affect their overall stability. To promote a more symmetrical and balanced appearance, consider trimming back the tips of branches. This encourages the growth of new shoots, giving your tree a fuller and more appealing form.
Pruning as a Preventative Measure
Regular pruning is not only therapeutic for your Norfolk Island Pine but also prevents the onset of future problems. By maintaining a well-groomed tree, you reduce the risk of overcrowding, improve air circulation, and minimize opportunities for pests and diseases to take hold.
Soil and Fertilization: Nourishing for Resurgence
A well-nourished Norfolk Island Pine is better equipped to recover from distress. Carefully assessing and adjusting the soil quality, pH levels, and fertilization routine are essential steps in the revival process.
Soil Quality Examination
The foundation of your pine’s recovery lies in the soil it resides in. Ensure that the soil is well-draining and free from compaction. Loosening the top layer can promote better aeration and root development.
pH Balance Adjustment
Norfolk Island Pines thrive in slightly acidic soil with a pH level between 5.5 and 6.5. Test your soil’s pH and make necessary adjustments to create the ideal growing environment. This ensures optimal nutrient uptake and overall health.
Selecting the Right Fertilizer
Choosing the right fertilizer is akin to selecting the right diet for your Norfolk Island Pine. Opt for a balanced, water-soluble fertilizer specially formulated for houseplants. During the growing season (spring and summer), provide regular feedings to supply essential nutrients.
Fertilization Timing
While providing nutrients is vital, it’s equally important not to overdo it. Follow the recommended dosage on the fertilizer label and avoid fertilizing during the dormant winter months. A well-timed and measured approach is key to a successful recovery.
Additional Nutrient Considerations
Keep an eye out for signs of nutrient deficiencies, such as yellowing leaves or stunted growth. Adjust your fertilization routine accordingly to address specific deficiencies and ensure your pine receives the nutrients it needs.
Pest and Disease Management: Defending Against Invaders
Pests and diseases can turn a struggling Norfolk Island Pine into a health crisis. Vigilance, early detection, and effective management strategies are your best allies in protecting your tree.
Identifying Common Pests
Know your enemy. Familiarize yourself with common pests that target Norfolk Island Pines, including spider mites, mealybugs, and aphids. Regular inspection allows for early intervention.
Natural Remedies and Chemical Solutions
Explore a range of solutions for pest control. Natural remedies like neem oil and insecticidal soap offer eco-friendly options, while chemical treatments can provide swift results. Choose the approach that best suits your preferences and the severity of the infestation.
Preventative Measures
An ounce of prevention is worth a pound of cure. Regularly inspect your Norfolk Island Pine for signs of pests, particularly when introducing new plants. Maintaining a clean and well-ventilated growing environment can deter pests and diseases from taking hold in the first place.
Environmental Factors for Norfolk Island Pine
In the quest to rescue a struggling Norfolk Island Pine, one cannot underestimate the profound impact of environmental factors. These majestic trees, revered for their lush greenery and distinctive elegance, thrive in conditions reminiscent of their native Norfolk Island in the South Pacific.
To rejuvenate your ailing Norfolk Island Pine, it’s crucial to create an environment that mirrors its natural habitat.
Illuminating Insights: Light Requirements
To ensure the well-being of your Norfolk Island Pine, understanding its light preferences is paramount.
Finding the Right Location: These pines flourish when basking in bright, indirect sunlight. Shield them from the harsh glare of afternoon sun, which can scorch their delicate foliage.
Artificial Lighting Options: In cases where natural light is insufficient, consider supplementing with artificial grow lights. These specialized lights provide the essential illumination your pine craves.
Adjusting Light Exposure: To promote even growth and prevent your pine from leaning towards the light source, remember to rotate it regularly.
Balancing Act: Temperature and Humidity
Norfolk Island Pines have a penchant for specific temperature and humidity conditions.
Ideal Temperature Range: Keeping your pine content requires maintaining a temperature range between 65°F and 75°F (18°C to 24°C) during the day. Slightly cooler temperatures at night are also recommended to mimic its native climate.
Humidity Levels and Methods to Increase It: Thriving in humid environments, Norfolk Island Pines may benefit from artificial humidity boosters. Misting, humidity trays, or small humidifiers can create the moisture-rich atmosphere they adore.
Protecting from Extreme Conditions: Protect your pine from harsh drafts, the chill of cold windows, and the desiccating effects of heaters. During frosty winters, shield it from the cold to prevent undue stress.
Recurring Questions
Can I Save a Norfolk Island Pine With Severe Root Rot?
Rescuing a Norfolk Island Pine suffering from severe root rot is indeed challenging, but not impossible. It requires careful intervention. Trim away the affected roots, repot the tree in fresh, well-draining soil, and adjust your care routine to prevent further stress on the plant.
What’s the Best Time to Prune My Norfolk Island Pine?
The ideal time to prune your Norfolk Island Pine is during early spring. This timing allows the tree to recover swiftly and initiate new growth during the upcoming growing season.
Should I Fertilize My Pine During the Winter Months?
No, it’s best to refrain from fertilizing your Norfolk Island Pine during the winter months. This dormant period is a time of reduced growth, and fertilizing can potentially harm the plant. Resume fertilization in the spring when the tree becomes active again.
Are Norfolk Island Pines Toxic to Pets?
Yes, Norfolk Island Pines can be toxic to cats and dogs if ingested. It’s crucial to keep these pets away from the plant to ensure their safety.
Final Notes
Your Norfolk Island Pine is a resilient and captivating addition to your home or garden. With proper care and attention, you can nurse it back to vibrant health. Remember to assess its health, address its specific needs, and provide a nurturing environment.
By following the steps outlined in this guide, you’ll soon witness your Norfolk Island Pine thriving once more, gracing your space with its timeless beauty.
![Dolphin Flower Plant [Total Care Guide]](https://www.daisynatives.com/wp-content/uploads/2023/12/Dolphin-Flower-Plant-768x431.webp)